|
|||||||||
Olszewski Disneyland~Fantasyland Collection
Description and Setup Instructions
Updated: December 10, 2025
Introduction
In 2012, Olszewski Studios announced and made available to collectors the Olszewski specially designed Disneyland~Fantasyland Platform. This Platform houses and displays the attractions, rides, accessories, and characters that are found in the Fantasyland Collection. Once the "Z" Scale pieces are housed in the platform base the "magic" that you experience at the Park is now at home with you, but in miniature. Configured with its own lighting kit you can turn down the room lights and see the buildings and sculptures "light-up." The following describes the Disneyland~Fantasyland Collection and provides the setup instructions for housing your collection on the Disneyland~Fantasyland Platform base. Background Located a short distance beyond the Sleeping Beauty Castle at Disneyland Main Street, U.S.A. lies Fantasyland where you can meet the heroes and villains of your favorite Disney stories. Snow White, Sleeping Beauty, Alice, even Dumbo and Peter Pan all meet to welcome guests to this distinctive environment where magical moments happen. Guests sing along to the classic songs and experience the pageantry of King Arthur Carrousel as they wait to take a spin in a tea cup or fly over London with Peter Pan, or cruise around town with Dumbo, The Flying Elephant. Now, you can revel in the enchantment of Fantasyland that surrounds you with the miniature architectural models of the structures found at Fantasyland created by Robert Olszewski, produced by his company, Olszewski Studios, for The Disney Company. The concept of creating and producing Fantasyland in miniature by Disney Artist, Robert Olszewski, became a reality for many collectors who were already familiar with the artist's work he has done for Disney in the Disneyland and Walt Disney World Magic Kingdom Main Street, U.S.A. Collections. Olszewski was already on his way with creating quite a number of buildings, sculptures, and attractions found at Fantasyland in Anaheim, CA. All that was needed was a specifically designed platform to house those "z-scale" buildings and sculptures that had already been released. In 2012, a platform was designed by Olszewski to house the collection pieces either as a separate display or one that can be connected to the Disneyland Main Street, U.S.A. Platform base. The Fantasyland Platform base is now being offered to collectors. The first production run has already been distributed to collectors. This section describes the Disneyland~Fantasyland in its entirety to include a description of the pieces found in the Disneyland~Fantasyland Collection and instructions on how to setup the platform and what is yet to come. Disneyland~Fantasyland Releases to Date To start with, the Table below lists the buildings and sculptures that make up the Disneyland~Fantasyland Collection that have been released to date. The name of the piece along with original release date and the issue price are listed. The artist's company, Olszewski Studios, makes periodic announcements when new pieces are released at special signing events arranged and scheduled by Disney Theme Park Merchandise. Announcements are also made when product re-releases of these open editions are made. Click here to make sure you are on the Olszewski Studios email list and that your contact information is current so you can be kept informed. Fantasyland’s Previously Released by The Disney Company and Designed to fit into Platform (Items listed in this table are sold only by the Disney Parks and Disney OnLine - Contact: 1-877-560-6477)
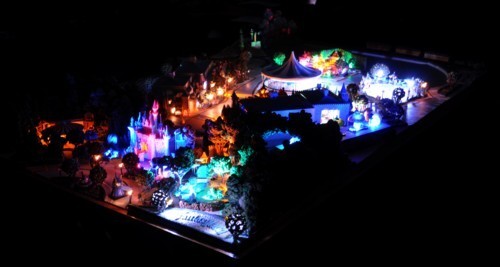
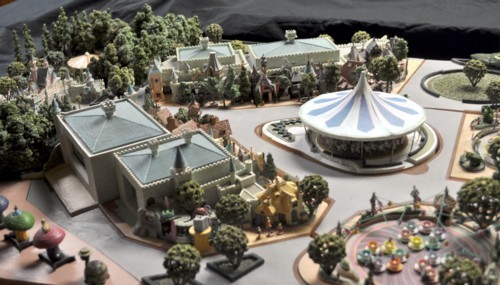
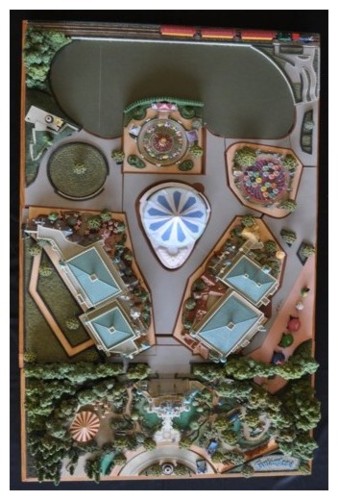
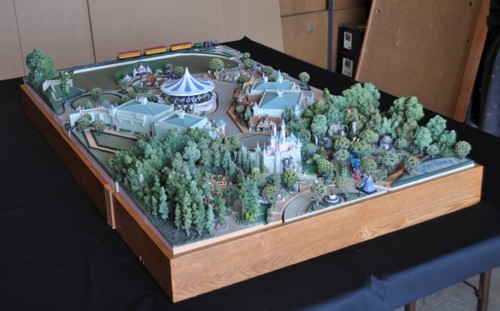
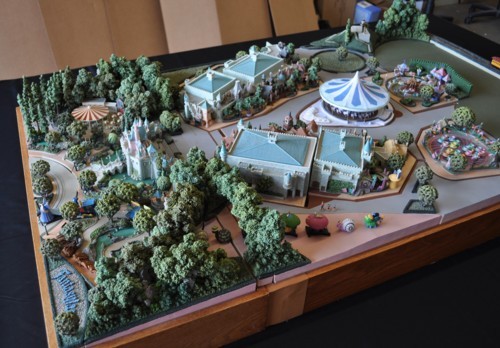
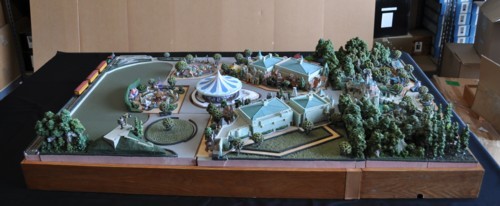
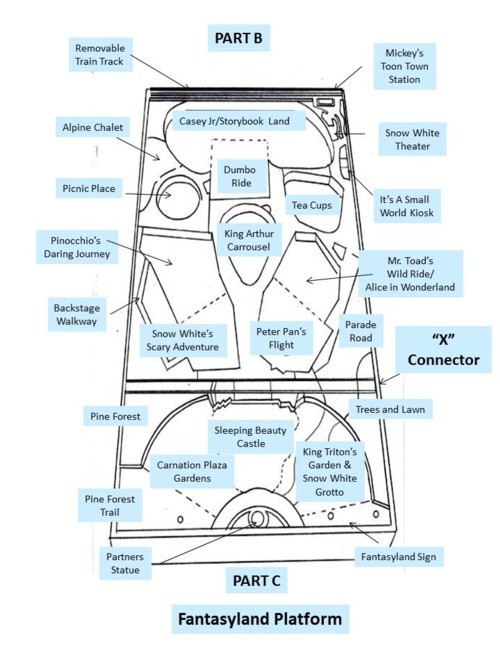
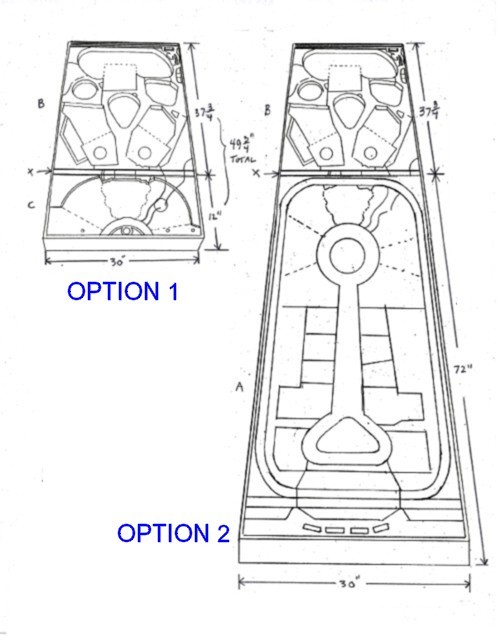
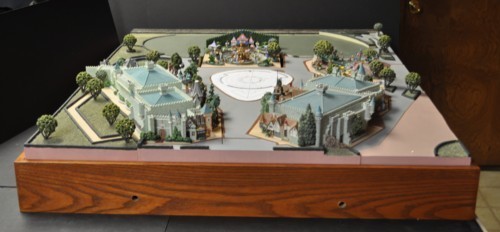
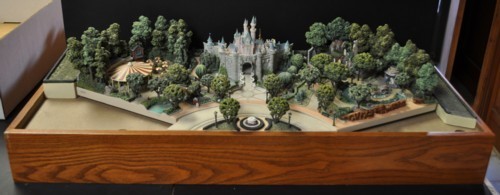
The Disneyland~Fantasyland Platform Base The image shown below is an image of the Olszewski Disneyland~Fantasyland Collection in a specially created platform base. This is referred to as the Disneyland~Fantasyland Platform full base. Take an imaginary walk as you walk from Main Street, U.S.A. towards the Sleeping Beauty Castle. You pass by the yet to be released "Fantasyland" sign which greets you on the right. You will pass by or through the Main Street, U.S.A. Central Plaza where the Partner's statue of Walt Disney and Mickey Mouse offers their greetings. This Central Plaza, however, is modified for the Full Base configuration as it is not the full version of the previously released version found in the Disneyland Main Street, U.S.A. Collection. From there you will pass near King Triton~Snow White Grotto on the right and Carnation Plaza Gardens on the left. You will then pass over the Sleeping Beauty's Castle draw bridge and meander through the arches of the castle entrance. After passing through the tunnel, you will enter the fasination of Fantasyland created in "Z" 1/220th scaled exact replicas of the park. This miniature layout is the same as that found at the Park's Fantasyland and replicates all of the buildings, attraction rides, and grounds found there. At night, the "Z" Scale miniature replica of Fantasyland lights up sharing its magic nostaligia that you so enjoy at the real park. Before we begin to describe the varying configurations of the Disneyland~Fantasyland Platform Bases available to accomodate your needs, here are a images that show the two different layouts.
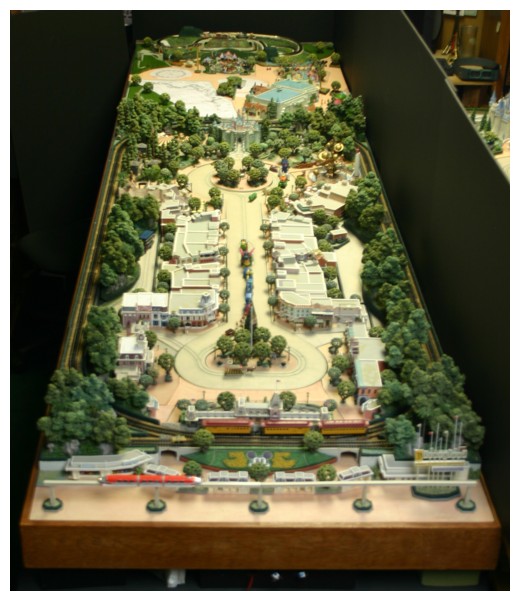
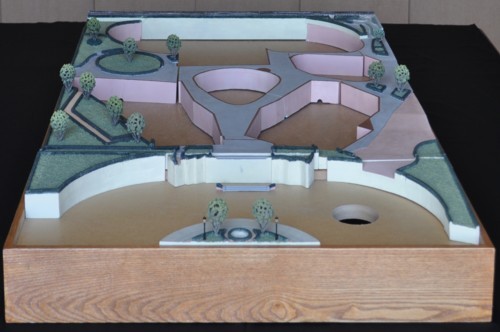
A second configuration allows the collector to connect the Disneyland~Fantasyland Platform base to the Disneyland Main Street, U.S.A. Platform. Shown below is an image of the two connected and laid out together.
As mentioned, the flexibility of the design by the artist allows collectors two different ways to display their Fantasyland Collection. These are described as Option 1 which is a full and complete Fantasyland platform to display by itself and Option 2 which connects the Fantasyland Platform Base to the Disneyland Main Street, U.S.A. Platform that houses that Collection. The following are descriptions of the two options.
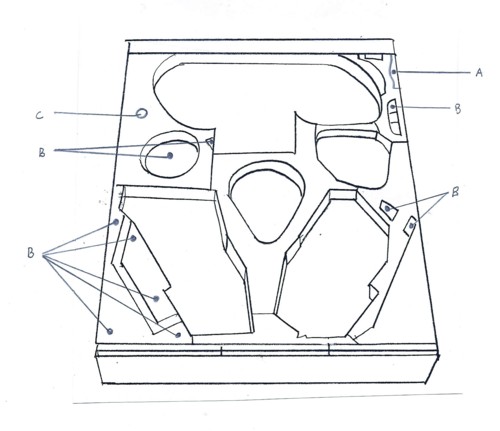
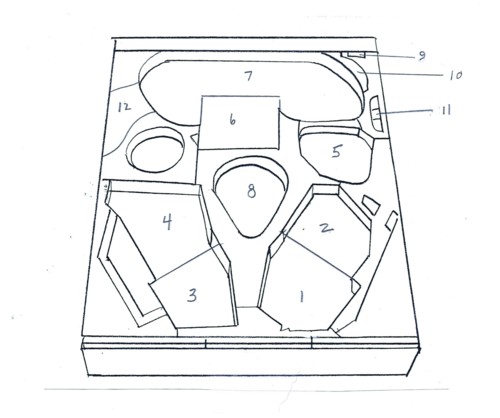
Below is a schematic that shows the locations of the various buildings, sculptures, attractions, etc. in the Disneyland~Fantasyland Collection Platform Base. This schematic guides the collector in placing their miniature replicas of the buildings and sculptures.
This needs to be modified as "X" Connector is not needed in this schematic.
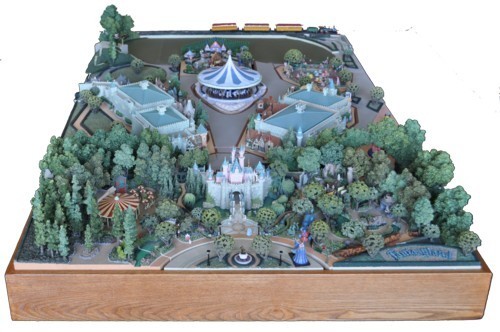
The remaining write-up addresses each option further in more detail to include the parts contained in your shipment and instructions of how to set up your particular configuration. Option 1 Fantasyland Full Base Description and Set Up Instructions. This is for a stand alone display of the Disneyland~Fantasyland Collection. The Disneyland~Fantasyland Platform Full Base that is previously mentioned as Option 1 above, consists of the following parts when shipped to you. Additional columns in the listing provides the placement location of the part onto the proper position as well as as a recommended order of placement onto the platform base. Shipping weight with packaging is a total of 88 pounds and consists of 3 separate boxes. Please take the time to inventory the parts to make sure you have themall. If you are missing any of the parts, please contact Olszewski Studios by email to info@olszewskistudios.com. Unpacking and Handling Your Platform: The Platform base weigh approximatley 50 pounds and requires at least to adults to handle it. We recommend that you carefully remove all shipping materials that cover the Platform. The contents of which can be found in Boxes #1 and #2 of your shipment? Parts list for the THREE-QUARTER Platform:
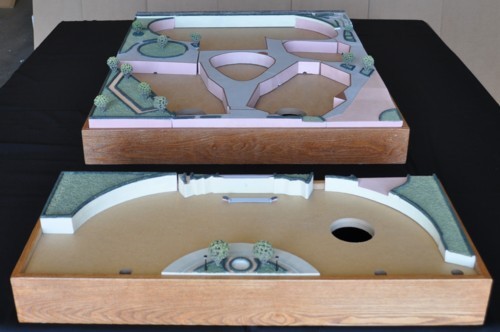
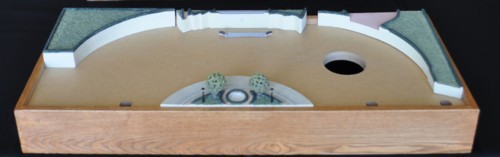
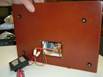
Shown below are images of the Disneyland~Fantasyland Full Platform Base that is shipped to the customer. In the foregound is the ONE-QUARTER section and in the background the THREE-QUARTER section. The image shown immediately below shows the Disneyland~Fantasyland front and back sections lying on a table with some of the landscape pieces on it. The table is draped with a black cover cloth. You can make your own table or you can purchase a standard 4 foot banquet table from a local store (be sure that the table you buy can handle approximately 250-300 pounds and is 30" wide).
The next discussion addresses the ONE-QUARTER Fantasyland Platform setup. The list of parts that were shipped can be found in the following listing.
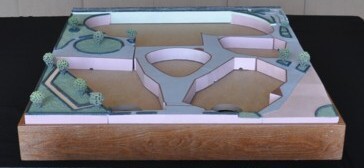
The next set of images are of different stages of the ONE-QUARTER Platform setup. The image shown immediately below shows the Platform sitting on a table with some of the landscape pieces installed. The table is draped with a black cover cloth. You can make you own table or can purchase a standard 5 foot banquet table from a local store (be sure that the table you buy can handle approximately 25-300 pounds). Again, be careful not to drag your platform base on a rough surface so as not to damage the protective and decorative wood frame surrounding the platform itself. Olszewski Studios recommends installing the various sculptures provided in the order they are listed in the 4th column in the above parts listing.
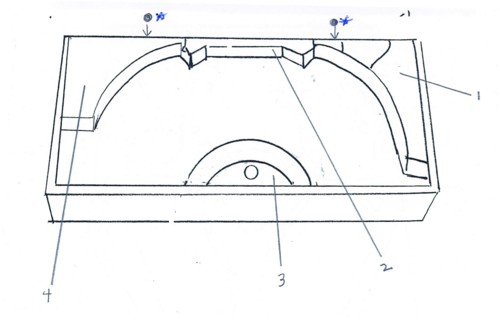
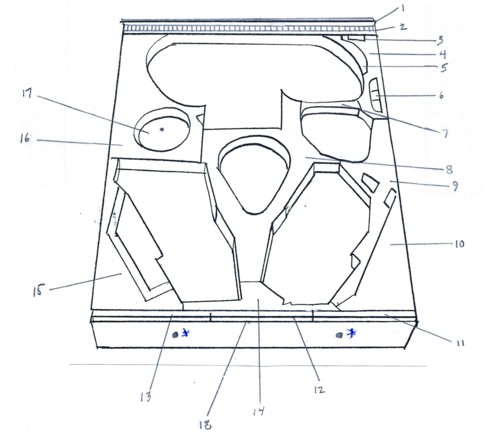
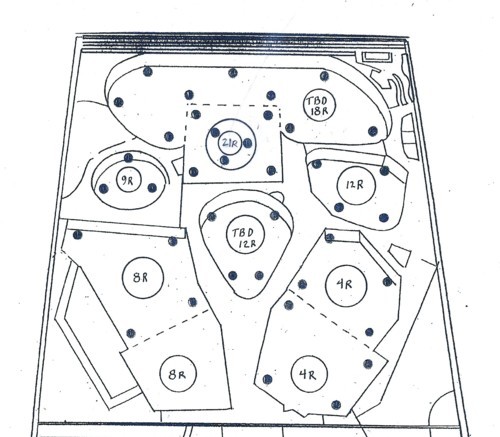
In the schematic shown below, you will find the locations of each sculpture that corresponds to the parts listing above. Position 1 is where the Electrical Parade Pathway is placed, Position 2 is where the Castle Courtyard is placed, and so on. At the top of the diagram the two astericks (*) show the location of the bolt holes used to connect to the Main Street, U.S.A. Platform.
The Disneyland~Fantasyland Platform measures 30" wide x 12 1/2" long and ??" high and is shipped in the box labeled Box #3. Box #4 has all of the parts previously listed. The images below show the placements of the various parts. Also in your shipment is a package containing 20 rubber risers to be used when you are ready to put your buildings in the platform. Due to the thickness of the landscape pieces, you may need multiple risers stacked to match the proper landscape height.
By now, both sections (ONE-QUARTER and THREE-QUARTER PLATFORMS) should be ready for connection to each other. You do this by placing the two sections together. To do this raise the sections off the table high enough to allow your hands to be places underneath and you will need to put bolts between the two bases. For this job, and to get the height the same, we used the green oasis blocks that are available in the floral section at the Michael's stor. You will need at least 12 blocks. Using the bolts included, remove the nut and washer. Thread the bolt through the bolt holes from the underside of the back THREE-QUARTER Platform and push the bolt through the bolt holes in the front ONE-QUARTER Platform. Put a washer onto the bol and then put the nut on. Before you tighten up the bolts, make sure that the back THREE-QUARTER Platform and the ONE-QUARTER Platform are evenly aligned with one another. Once this is completed, you are now ready to start to put together the Disneyland~Fantasyland Platform.
Before you start to place landscape parts into the bases, you need to decide if want to bolt the Front ¼ section to the Back ¾ section. This will make the platform more stable, but is optional. Your assembled Disneyland~Fantasyland Platform – will be 30” wide x 4’ 2” long. You can make your own custom table or you can purchase a standard 5’ by 30” banquet table and expect to have 10” of extra room at the table ends. Once unpacked, place the back THREE-QUARTERS platform base on the table with the bolt holes facing the inside, ready to face the bolt holes of the front ONE-QUARTER section. To make this assembly easier, you will need to raise the entire platform off the table high enough to make space for your hands to work underneath. For this job, and to get the height the same, suggest using green oasis blocks that are available in the floral section at Michael's. You will need at least a dozen blocks. Using the bolts included in the shipment remove the nut and washer. Thread the bolt through the bolt holes from the underside of the back THREE-QUARTER platform and push the bolt through the bolt holes in the front ONE QUARTER platform. Place a washer onto the bolt and then screw the nut on. Before you tighten up the bolts, make sure the back THREE-QUARTER setion and the front ONE-QUARTER section are evenly aligned with one another. Once this is completed, you are now ready to start to put together your miniature Disneyland~Fantasyland Collection on the Platform. To begin this next step, go to the last section of this set of instructions "Instructions for Removing the Sculptures from their Wooden Bases." END OF OPTION 1 SECTION Option 2 Fantasyland Three-Quarter Base Description and Set Up Instructions - connecting to the Disneyland Main Street, U.S.A. Platform Base This write up is for connecting the Disneyland~Fantasyland Collection to an existing Disneyland Main Street, U.S.A. Platform base to display the Collection. The parts you will need are included in the list provided earlier under Option 1. It is repeated here.
For those who are connecting the Disneyland~Fantasyland Platform to an existing Disneyland Main Street, U.S.A. Platform need to order only the Disneyland~Fantasyland Platform THREE-QUARTER base. To connect the Disneyland~Fantasyland Platform base to the Disneyland Main Street, U.S.A. Platform Base you will first need the Three-Quarter Platform Base using bolts that have been included in your shipment. If you plan to have made separate plexiglas covers, you will need to include the "X" wood strip between the two platforms as well. Regardless, connecting using bolts is optional, but they will make the two platforms more stable when connected. If you do decide to bolt the 2 platforms together, you will need to drill holes into your Disneyland Main Street Platform. You can use the pre-drilled holes in the Fantasyland Platform Three-Quarter Base as guide holes to make sure that your bolts holes are drilled in the correct spots. Also, before you get started on this procedure, it is recommended that you remove all your Disneyland Main Street buildings and tree packs from the Main Street Platform before you start drilling. We recommend removing the buildings, etc. to lighten the weight of the platforms. To get started, place the Fantasyland Platform Three-Quarter Base piece with the bolt holes facing towards the front, and place this platform directly behind the Main Street Platform. To make this assembly easier, you will need to raise the entire platform off the table high enough to make space for your hands. For this job, and to get the height the same, use the same size blocks to place underneath. We recommend using the green oasis blocks that are available in the floral section at a Michaels' retail store. You will need at least 18 blocks. Make sure that the 2 platforms are level with each other and use a pencil, pen or large nail and place through the bolt holes to make marks on your Main Street Platform. Next move the Fantasyland Platform Three Quarter Base so you have a clear view of the Main Street Platform. Using a ¼” drill bit, drill bolt holes through your Main Street Platform where marked. Now put back in place the Fantasyland Platform Three Quarter Base. Using the bolts included in the shipment, remove a nut and washer. Thread the bolt through the bolt holes from the underside of the back ¾ platform and push the bolt through the newly created bolt holes in the Main Street Platform. Put a washer onto the bolt and then put the nut on. Before you tighten down the nuts onto the bolts, make sure that the three-Quarter base and Main Street Platform are evenly aligned with one another. Once this is completed, you can put the buildings and trees back into your Main Street Platform and you are now ready to start to put together the Disneyland – Fantasyland Platform.
The Disneyland – Fantasyland Platform – Back ¾ Base section measures 30” x 37 ¾ ” and is shipped in the labeled Box #1. Box #2 has all parts listed previously. The images in Figure 1 & 2 identify placement and position of the landscape parts. Also in your shipment is a package of 100 rubber risers to be used as you set your buildings in place. Due to the thinkness of the landscape pieces, you may need multiple risers stacked to match the proper landscape height
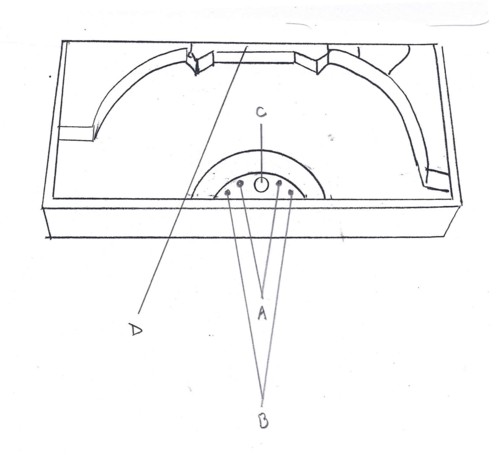
After you have set up the Platform, you will now want to begin placing those sculptures you have collected on the Platform itself. Before you can do this, you will need to remove the sculpture from the wooden base that came with it. The image below shows a partially filled Disneyland~Fantasyland Platform Base. Again, the next image is a schematic showing the correct placement of the sculptures into the Platform.
Each sculpture released to date that is part of the Disneyland~Fantasyland Collection is listed in the table below. Each of the sculptures came mounted to a wooden base which must be removed before installing into its proper place on the Disneyland~Fantasyland Platform base. All that is needed to remove the wooden base is a small to medium size Phillips Head screwdriver. Images to coincide with the steps in the process are provided below. Using the table and schematic shown just before this section and the assistance of another individual (which we recommend) begin with your first sculpture removal from the wooden base.
At the moment, Olszewski Studios has satisfied the first production run of 100 platforms. Once we receive an additional 50 reservations, we will order again. If you would like to put your name on the Disneyland~Fantasyland Platform Base reservation list, please click here. This will take you to a form to fill out and once you have done that, submit it and we will notify you when we begin another platform production run. Should you have questions regarding the above and/or status of your order, please email us at: info@olszewskistudios.com.
|
||||||||||||||||||||||||||||||||||||||||||||||||||||||||||||||||||||||||||||||||||||||||||||||||||||||||||||||||||||||||||||||||||||||||||||||||||||||||||||||||||||||||||||||||||||||||||||||||||||||||||||||||||||||||||||||||||||||||||||||||||||||||||||||||||||||||||||||||||||||||||||||||||||||||||||||||||||||||||||||||||||||||||||||||||||||||||||||||||||||||||||||||||||||||||||||||||||||||||||||||||||||||||||


All figurines and displays are copyrighted by ©Disney, ©Goebel Miniatures, and ©Olszewski Studios
info@olszewskistudios.com
Web Design By Moe Technologies, Inc.