|
|||||||||
Frequently Asked Questions
Last Updated: September 18, 2013
Note: www.disneygallery.com has a FAQs section dedicated to Olszewski and Main Street USA Program. Click here to take you there. Q: The image on the shipping box for the Central Plaza Hub has miniature people shown, are these supposed to be included in the piece?
Q: Are the LED lights that shine on the [Sleeping Beauty} castle suppose to change color like they do on Cinderella's Castle?
Q: Is there a way to by-pass the timers on Cinderella's Castle and Electrical Parade?
Q: Does Olszewski Studios provide repair service?
Q: Which buildings in the Main Street, U.S.A. Collection have flags? I ask this question because I want to determine if any of my buildings are missing flags. Thank you, Kevin of Portland, OR
Q: I have a question on the Main Street Electrical Parade Set 1 (DL0601), while having it plugged in with the AC power adapter it only stays lighted up for approx 15 min. Is this how it is supposed to work or should it stay lit until the power switch is turned off? Kevin. A: A number of the first units for Sets 1 and 3 had timers. This has now changed and now all ELP sets produced will not have timers. To by-pass the timer on the earlier units that have them is to solder the time joint. Check Bruce Richard's website for further information by clicking here. Q: Where are the turn-on/turn-off switches located on the Main Street buildings that are configured with lights? A: With the exception of the two Castles (Sleeping Beauty's Castle at Disneyland and Cinderella's Castle at Walt Disney World) all switches are push down action. The Castle pieces are "back and forth" action.
Main
Street U.S.A. Collection:
Sleeping Beauty Castle – The switch can be found on the left side near the back. This switch has a “back and forth” action vice a “push down” action. A tree is provided to cover the switch. Central
Plaza –
City Hall and Fire Station – The “push down” button switch is covered by a red fire hydrant that is located in the back of the piece on the right side. Town
Square –
Main Street Train Station – The “push down” button switch is covered by a red fire hydrant located on the right side of the Main Street side of the piece.
Candy Palace ~ Refreshment Corner –The “push down” button switch is covered by a red fire hydrant located in the back of the piece.
Castle Bros.~ Disney Clothiers ~ East Center Street - The “push down” button switch is covered by a red fire hydrant located in the back of the piece. Crystal Arts ~ China Closet ~ Main Street Photo ~ East Plaza Street - The “push down” button switch is covered by a red fire hydrant located in the back of the piece. Plaza Inn - The “push down” button switch is covered by a red fire hydrant and located on the far left side front of the piece. King Triton's Garden~ Snow White's Grotto - The “push down” button switch is covered by a red fire hydrant and is located in the front on the right. Plaza Pavilion~ Walt Disney's Enchanted Tiki Room~Aladdins' Room~Aladdin's Oasis - The “push down” button switch is covered by a red fire hydrant located in the right front of the piece. Gateways to Frontier Land and Adventure Land - The “push down” button switch is covered by a red fire hydrant located on the left front side of the piece. Carnation Garden - The “push down” button is covered by a red fire hydrant located on the left front side of the piece. Commerative Collection:
Mad
Tea Party – switch is a push button covered by a green fire hydrant and can be found on
the left side near the back of the piece.
Jungle
Cruise – switch is a push button covered by a red fire hydrant and can be found to the
left of the building in the front.
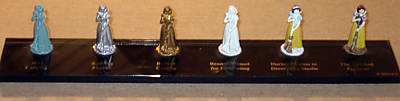
Pinocchio's Daring Journey - switch is a push button covered by a brown trash can in front of the Village Haus (to the right of the piece). Pirates of the Caribbean with Disney Gallery - switch is a push button covered by a green fire hydrant on the front left. Peter Pan's Flight - switch is a push button covered by a red fire hydrant and can be found near the middle in front. Dumbo the Flying Elephants - switch is a push button covered by a red fire hydrant on the left front of the piece. Mr. Toad's Wild Ride / Alice in Wonderland Attraction - switch is a push button covered by a brown trash can and can be found in front of Mr. Toad's House. Snow White's Scary Adventure - switch is a push button covered by a red fire hydrant and can be found at the far right side of the front. Q: In response to a few inquiries about by-passing the timer configuration on the Main Street, U.S.A. pieces. Here is what Olszewski Fan Bruce Richards has reported. Should further clarification or questions be necessary, Bruce can be contacted through his website. A. It’s fairly easy to disable the timers on the Lighting Boards. Pull off the cosmetic base of the piece and locate the circuit board that connects all of the wires. There’s only one so it’s easy to spot. Find the transistor on the board, it’s the small black part sticking up with three leads attached and is labeled “8050”. On the board you’ll find an “E” marked next to one of the three leads. A few of the pieces, like the Orbitor, have the board mounted up-side-down so you have to remove the board to gain access to the transistor. They’re usually just attached with hot-glue so you can cut the glue and pull off the board without much drama – just be careful not to break any of the little wires. Once you have access to the transistor, short the “E” lead of the transistor to the center lead with a dab of solder or a thin piece of wire. Make sure the solder or wire does not touch the third lead of the transistor. The process should be reversible without damaging the board if the soldering/wiring was done with a bit of care. However, I have told several collectors how to make the modification, but I recommend against it. Many of the lamps used on the buildings have a relatively short life, on the order of a few hundred hours, so leaving the pieces turned on will cause those lamps to fail (it’s a particular problem with the tiny 1.2mm lamps used in the Street Lights). I’m also concerned about the long term effects of operating the lights and electronics on heat build up inside the pieces when running on the AC Adaptors. I tell collectors that if they do the mod they need to monitor the heat of the piece, especially the big resistor on the Lighting Board, and determine if it is getting too hot for their liking. My guess is that heat won’t be an issue when running on the AC Adaptor, but I’ve never tested it so I’m being careful. Heat is not such an issue when running on batteries or the Main Street Lighting Kit So far as I know, no collector has made the above described modification because of the lamp life issues. But, it’s a safer modification to make on pieces that only have LED illumination, like the Marquee, Rocket to the Moon, Souvenir Stand, and other smaller buildings. Q: I recently visited disneyland in california and loved your minatures of the park. I would like to start collecting the different pieces., but before i do so i want to make sure i am going to be able to purchase them all. Will the pieces be available. In addition how can i purchase the board and the accessories. Is there a list of all the pieces made so far , listing what is or isnt available? Thank you Steven A: Steven: Thanks for your email! We intend to continue to have the Main Street Collection go on for many years. All the pieces will periodically come back and be made available. The program is based on a continuity style of release. Not everything is available all the time. It generally takes 3-4 years to re-introduce every design in the collection. This is the same with the Main Street Platform (board). We intend to produce the board as well as the Tree Accessory Packs and Lighting kit periodically. As you know right now Tree Accessory Pack #1 and the Lighting Kit are available. Tree Accessory Pack #2 is scheduled for this spring and then the board for later this fall. Make sure you keep your contact information up to date allowing us to communicate when new items are released. Go to www.olszewskistudios.com/contact.us/php. Q: Hi to all at Olszewski Studios and a very Merry Christmas and Happy New Year. I am trying to find out more about the Snow White - Miniature Casting Process piece that I have seen a couple of times on eBay. I have attached a picture. I am a collector of only Snow White and this would be a terrific addition to my collection. Is it still a retail item? Was it EVER a retail item? Have you any ideas where I could get one from? Thanks for your help in this matter, you would make a SW&7D collector from Great Britain a very happy one! Speak soon, Tony Oxtoby (AKA Magic Mirror) A: Thank you for your email! Merry Christmas and a Happy New Year to you as well. The picture you sent is called a "process stick" or also sometimes called a "progressive stick." These were produced for the sales representatives during the Goebel Miniature era when my brother was the Master Artist from 1980 to 1994. There is a lot of information on our website of Robert's nearly 40 years of art. The stages are identified from left to right as: (1) Wax Carving (2) Sterling Master produced using the "lost wax" process (3) Bronze production piece (4) Bronze painted solid white (5) First stage painted bronze (6) Final stage painted bronze You will find a better write up at this link: www.olszewskistudios.com/TechnicalCreativeProcesses.php The particular Snow White piece is the original from the Snow White and Seven Dwarfs Collection that was sold through Grolier, a mail marketing house. Robert was commissioned to produce the set for Grolier. You will find these marked S-1 through S-8. Later, Goebel Miniatures, acquired the rights to market the item in an extended set of displays and figurines.
Q: How much did the progression (AKA Process Sticks) sets retail for when Goebel made them? A: The process sticks (AKA Progression sets) were sold to retail dealers for around $125.00. They were to be used as marketing tools to help sell the miniatures. They were not to be used for resale, that is why we have never posted an issue price for these process sticks. Additional information about the progressive sticks or also known an process sticks can be found by clicking this link which will take you to an article published in December 1992 by Collector's Mart magazine. The article was written by Dick Hunt, author of a book published titled "the Goebel Miniatures of Robert Olszewski." Q: Will the Pirates of the Caribbean scenes be the same size as the Haunted Mansion scenes as I am considering additional Light Displays? A: The Pirates of the Caribbean (POTC) scenes will not be the same size as the Haunted Mansion (HM) scenes because the the lighting configuration is quite different. The light displays for the HM scenes project from the bottom-up, while the Pirate scenes project from the top-down. A Light Display will be designed specifically for the Pirate scenes. This is available for sale at this link. |
Q: Your web-site says Cinderella's Castle is the only piece currently available for Disney World. Are there plans for more pieces and a complete Main Street for Walt Disney World? A: A similar program to that being created for Disneyland will also be created for Walt Disney World. For Disney World there have actually been three sculptures released to include: Cinderella Castle, City Hall & Fire Engine Company No. 71, and Town Square. There have also been some accessories available to include: Princess Character Pack, Omnibus, and Horse Drawn Streetcar and the Fab Five Character Pack. |
Q: How can I have my Olszewski works of art signed by the artist? A: Olszewski Studios' long-standing policy on "signing" has been for the artist to sign pieces only at the event where he is appearing. The rationale behind this policy is the personal meeting between the artist and the collector as well as protecting the integrity of the art work. Less than 10 percent of all the art Olszewski has produced over the 45 years carries his |
Q: Will I be receiving future mailings like the postcard I've received announcing the launch of the Olszewski Studios' web-site? A: All future communications from Olszewski Studios will be provided via the Internet through this web-site or by our eCampaigns. If you wish to receive future communications, please continue to check our web-site and be sure to sign up for the email campaigns at Contact Us. |
Q: Can you provide me more information on the Disneyland Main Street program? A: Information regarding the Disneyland Main Street U.S.A. program by Robert Olszewski can be found by clicking here. To order pieces by mail you need to call 1-877-560-6477 or check for availability on the Disney Store.com website. When you get there, do a search on Olszewski and see the results. |
Q: What about the Disney World Main Street USA program by Robert Olszewski? A: Information on this program is also available at www.disneygallery.com. If you wish to order the Cinderella Castle which is the only piece currently available, please call Disney Merchandise Services at 1-877-560-6477 Additionally, there are a number of recommended links on our web-site. |
Q: Can the lights be changed in the pieces? A: Yes, the lights can be changed in the pieces. The LED’s should not need be changed as they have a life expectancy of 10,000 hours. The small street lamps have a 1.3mm incandescent bulb and can be changed easily by removing the faux wood base (unscrew the 3 or 4 mounted screws). Pull the lights out from the street lamp from below and clip the wires. Take a new bulb and twist each pair of wires together (keep the positive and negative wires apart using electrical tape). Push the new bulb back up into the lamp post and tape the wires to the piece, so the bulb does not slip back into the post. Put the faux wood base back on the piece. New street lamp bulbs can be purchased at your local hobby shop or from Olszewski Studios at www.olszewskistudios.com. Q: Where can I purchase replacement bulbs? A: The best replacement available for the Olszewski incandescent Street Lamp bulbs is as follows: Search the internet for "Micro Miniature Lamps 1.5V 15mA 1.2mm Diameter Clear." Make absolutely sure the replacement bulb says "15mA" in the description or it has "18001xx" somewhere in the part number (where xx can be anything). There are many versions of this little bulb, so make sure you have the right one. As of September 2013, the bulb was available at the following link: Please note that the part number may have changed in the last months/years, so don't be surprised if te link doesn't work today. The bad news is that this bulb isn't quite as bright as the version originally found in your piece, but, it is close and the only one available in America (according to one source). Be aware also that the new lamp isn't as bright as the original. The good news along this vein is that the new bulb will last a lot longer than the original version of the bulb. It was the extra brightness that shortened the life of the original bulbs. Q: During the July 27, 2013 event at the Tarentum Museum, Bob signed my two Geppetto's WOrkbench pieces and one of the new Disneyland Tiki Room pieces. On the Tiki Room, he signed it with the usual "Olszewski" signature and the two Geppetto's Workbench pieces he signed as "Robert Olszewski," I am curious as to the reason why he signed these pieces differently? Curt, Western PA. A: The reason for the two different signatures is related to the surface finishes on the pieces. The Gallery of Light finishes are glossy and a script signature is less likely to flow so Bob will usually go with the printed letters on the gloss finishes. Sok, just in case the ink is resisted on the gloss, Bob has a better chance to go over the individual letters and assure a clear signature. The surface and the easy access on the Pinnochio boxes makes it possible to flow the connected script letters. Making the signatures clear and legible is very important to me. Also, the anle of the access with the pen on the Gallery of LIghts is awkward and does not take advantage of how the rapidograph pens are designed so Bob takes care on these to give the best signature possible. As for the Tiki printed signature, the Tiki surface is the same as the Geppetto piece and is the reason Bob is more inclined to print his signature due to the size of the surface area. A tighter and smaller surface and awkward shape to hold the the pen would cause him to tighten up and go with the more controlled printed signature. Q:
|
All figurines and displays are copyrighted by ©Disney, ©Goebel Miniatures, and ©Olszewski Studios
info@olszewskistudios.com
Web Design By Moe Technologies, Inc.